Django and Tailwind CSS: A Multi‑Stage Build Strategy for Lightweight Docker Images
For backend developers, CSS can feel like an endless chore. After the days of painstakingly writing every line of style.css, the arrival of Bootstrap brought a wave of excitement. Yet, as maintenance piled up, customizing Bootstrap beyond its predefined framework became increasingly painful.
The current trend is unmistakably Tailwind CSS. Its utility‑first approach—styling purely through class combinations—offers a near‑miraculous relief for backend engineers. I’ve personally removed Bootstrap from existing projects and migrated to Tailwind, proving that this tool has become indispensable for modern web development, especially within Django.
In this post, I’ll share a production‑ready Docker image optimization strategy for Django projects that use Tailwind CSS, focusing on keeping the image lightweight through a multi‑stage build.
Problem: Docker Images Grow Unnecessarily Large

The go‑to package for integrating Tailwind into Django is django‑tailwind. It’s well documented and works great in local development.
The issue arises during deployment, particularly when using Docker containers.
Locally or on bare‑metal servers, you can build CSS with a simple command:
python manage.py tailwind build
However, this internally requires Node.js and npm. Consequently, the production Django Docker image ends up bundling Node.js, which is inefficient in several ways:
- Runtime bloat – Node.js is only needed once for the build.
- Image size – The image grows unnecessarily.
- Security – Unneeded binaries increase the attack surface.
Our goal is clear:
"Pull only the built CSS into a pure Python runtime image that has no Node.js installed."
We achieve this with Docker’s multi‑stage build.
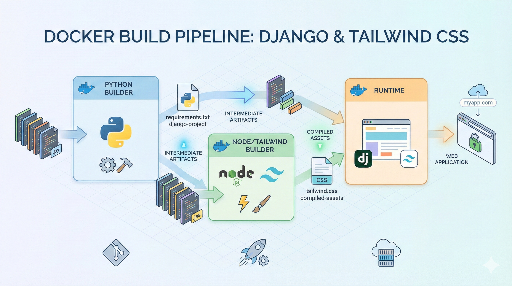
Solution: A Three‑Stage Multi‑Stage Build
Using Docker’s multi‑stage build, we can cleanly separate the build process into three stages:
- Python Builder – Build Python packages into wheels.
- Node Builder – Compile Tailwind CSS with npm.
- Final Runtime – Copy only the results into the final image.
This approach leaves the final image free of Node.js and build tools, containing only what’s needed to run the application.
Dockerfile Example
Below is a Dockerfile tailored for a typical Django + Tailwind project. Adjust paths and filenames to match your own project structure (e.g., the theme app name, static file locations, etc.).
# -------------------------------------------------------------------
# Stage 1: Python Builder
# Install Linux dependencies and build Python packages into wheels.
# -------------------------------------------------------------------
FROM python:3.11-slim as python-builder

WORKDIR /app

COPY requirements.txt .
RUN pip install --upgrade pip && \
    pip wheel --no-cache-dir --no-deps --wheel-dir /app/wheels -r requirements.txt


# -------------------------------------------------------------------
# Stage 2: Node Builder
# Use a Node image to compile Tailwind CSS.
# -------------------------------------------------------------------
FROM node:20-alpine as node-builder

WORKDIR /app

# Copy the entire project so Tailwind’s JIT can scan Django templates and Python files.
COPY . .

WORKDIR /app/theme/static_src

# Install dependencies and run the build script defined in package.json.
RUN npm ci
RUN npm run build

# The build output is assumed to be:
#   /app/theme/static/css/dist.css
# (Adjust the path if your configuration differs.)


# -------------------------------------------------------------------
# Stage 3: Final Runtime
# The final image contains only the Python runtime and static files.
# -------------------------------------------------------------------
FROM python:3.11-slim

WORKDIR /app

# 1. Install Python packages built in Stage 1.
COPY --from=python-builder /app/wheels /wheels
COPY --from=python-builder /app/requirements.txt .
RUN pip install --no-cache-dir /wheels/*

# 2. Copy the application source code.
COPY . .

# 3. Copy only the CSS built in Stage 2.
COPY --from=node-builder /app/theme/static/css/dist.css \
    /app/theme/static/css/dist.css

# 4. Run collectstatic to gather all static files.
RUN python manage.py collectstatic --noinput

# Start the application.
CMD ["gunicorn", "--bind", "0.0.0.0:8000", "config.wsgi:application"]
Additional optimizations you might consider:
- Use
.dockerignoreto exclude unnecessary files (e.g.,.git, local media). - Set environment variables like
PYTHONDONTWRITEBYTECODE=1andPYTHONUNBUFFERED=1. - When using Alpine, install only the system libraries you truly need.
Key Takeaways
1. Separate the Node Builder Stage
Stage 2 focuses solely on CSS compilation. Tailwind’s content setting often scans Django templates (templates/**/*.html) and Python code, so copying the entire project ensures the JIT mode detects all classes. If your project is large and the content paths are tightly scoped, you can copy only the necessary directories (e.g., static_src, templates) and adjust the COPY paths accordingly.
2. Leverage the npm run build Script
django‑tailwind generates a package.json with a typical build script:
{
  "scripts": {
    "build": "tailwindcss -c tailwind.config.js -o ../static/css/dist.css --minify"
  }
}
In a multi‑stage build, you simply run npm run build (or a custom script) and then copy the output. Knowing the exact output path is all you need.
3. Resulting Image Size & Security
Stage 3 shows that:
- No Node.js, npm, or Tailwind CLI remain in the final image.
- Python packages are installed from wheels, speeding up build and caching.
- The image is lean, reducing attack surface and storage costs.
Over time, these small gains translate into faster CI/CD pipelines, lower registry storage, and fewer security review items.
Conclusion
When building Docker images, it’s tempting to throw everything into one image to get it working. In production, however, image size, build time, and security are paramount.
By applying the three‑stage multi‑stage build described above, you can:
- Limit Node.js to the build stage.
- Keep the runtime image a pure Python environment with only the compiled static assets.
- Enjoy a lighter, more predictable, and easier‑to‑maintain deployment.
If you already have a running project, try this approach in your next deployment pipeline. Once the pattern is in place, it can be reused almost verbatim for new projects.

There are no comments.