🐳 Starting Your Docker Image Diet: Uncovering Its Ancestry with docker history
You've deployed a seemingly lightweight app, but then you check the image size and it's well over 1GB. You might think, "What did I even put in there?" It's a common frustration. This is precisely when you need to delve into the image's 'lineage' or 'history'.
"What Did You Eat to Get So Big?"
A Docker image is like an onion, with layers stacked one upon another. The docker history command acts as an X-ray, peeling back these layers one by one to reveal the culprit behind its size.
Its basic usage is quite straightforward.
# Basic Usage
docker history [OPTIONS] <IMAGE:TAG>

# Example: Check my app's history
docker history my-app:latest
Executing the command will display the image's history, starting from the newest layer all the way down to the base image, in reverse chronological order.
IMAGE          CREATED          CREATED BY                                      SIZE
a6215f271958   5 minutes ago    /bin/sh -c #(nop)  CMD ["/bin/sh"]               0B
<missing>      7 weeks ago      /bin/sh -c #(nop) ADD file:f28242cf608f6...     7.81MB
Pay close attention to the SIZE column. If you see hundreds of MB where you'd expect 0B, that's your target for optimization. With experience, you'll start to detect "suspicious areas" that clearly indicate bloat.
**💡 Useful Tip:
--no-trunc**The default output truncates long commands. Appending the
--no-truncoption displays the full command without truncation, which is essential for accurate analysis.
docker history --no-trunc my-app:latest
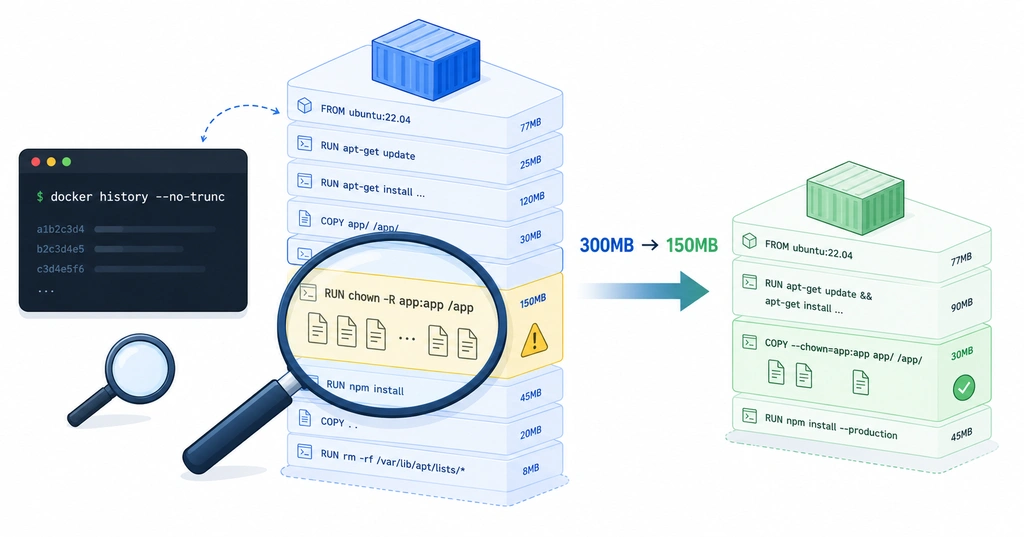
Real-World Case Study: "The Culprit Was chown"
Let me share a real-life incident I encountered. I built a project with files totaling 150MB, yet the resulting image inexplicably ballooned to over 300MB. The culprit turned out to be two seemingly innocuous lines in the Dockerfile.
[Inefficient Method: Creating Two Layers]
# 1. First, copy the files (copied as root by default)
COPY . .

# 2. Change ownership for security (executed as a separate command)
RUN chown -R appuser:appgroup /app
After building this and checking with docker history, I found the following result:
IMAGE          CREATED BY                                        SIZE
<layer_id_2>   /bin/sh -c chown -R appuser:appgroup /app         150MB  <-- (The problem spot!)
<layer_id_1>   /bin/sh -c #(nop) COPY dir:abc in /app            150MB
Here's where the insidious nature of Docker layers reveals itself. When 150MB of files are copied in step 1, one layer is created. However, when chown is executed in step 2, Docker thinks, "Oh, the file metadata (ownership) has changed? I'd better create another layer with this new state!" and proceeds to copy the entire 150MB again, stacking a new layer on top.
Consequently, the content remained identical, but files with different ownership were stored twice, effectively doubling the image size.
The Solution: A One-Line Diet!
The solution is simple: specify the ownership right from the copy command, merging it into a single layer.
[Efficient Method: Creating One Layer]
# Copy and specify ownership simultaneously!
COPY --chown=appuser:appgroup . .
After modifying the Dockerfile this way and running docker history again, the results are dramatic.
IMAGE          CREATED BY                                               SIZE
<layer_id_1>   /bin/sh -c #(nop) COPY --chown=appuser... dir:abc       150MB
See? Only a single layer was created, and the image size gracefully returned to a lean 150MB. Merging two commands into one effectively halved the image's footprint.
Conclusion: Always Check 'History' After Building!
Never forget that a Docker image generates one layer per command line.
Just as you test your code after writing it, make it a habit to run docker history --no-trunc after building your images. As you ponder questions like, "Why is this apt-get so heavy?" or "Why was this layer split unnecessarily?", you'll gradually build extremely lightweight and efficient systems.
Unnecessary layers are the enemy of an efficient system!
Was this helpful? If so, please give it a like!
Also read our related articles.
Related Articles
Understanding Docker Shared Memory (shm_size and ipc) Perfectly
Docker: Communicating Between Containers via Host Ports Without Network Sharing