Introduction: Fitting the Last Puzzle Piece

Hello! Finally, we are at the last installment of this long series. In the previous four parts, we began with the theory of automated deployment systems, implemented the core logic of a FastAPI webhook server, and established a stable operating environment using Systemd services.
You can find the previous posts in this series at the links below.
② Overall Architecture and Process Design
③ Staging Server Setup and Basic Construction of FastAPI Webhook Server
④ Detailed Deployment Handler and Systemd Service Registration
However, there is still one step left. Currently, our FastAPI webhook server runs only on port 8000 and does not use HTTPS, making it vulnerable to security issues. Additionally, GitHub strongly recommends using a public domain with HTTPS connections.
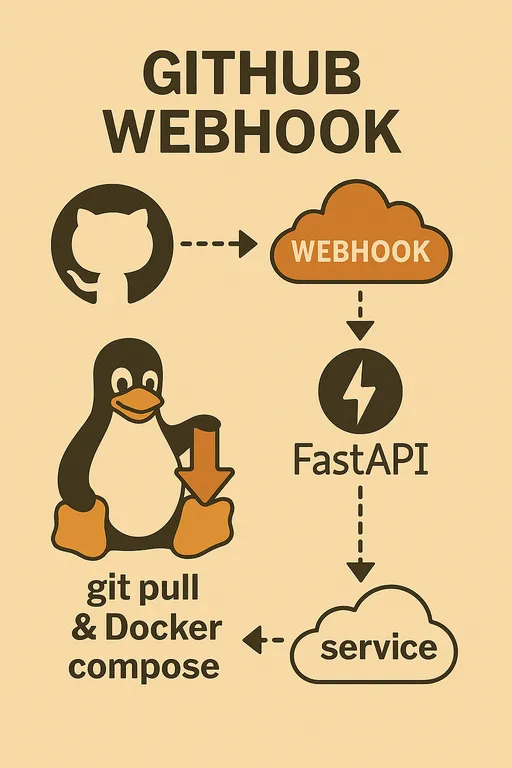
In this fifth part, we will fit the last pieces of the puzzle and complete the system. We will configure Nginx as a reverse proxy to safely expose our FastAPI server to the outside world, apply free HTTPS through Let's Encrypt, and finally, integrate GitHub webhooks to complete the automated deployment system.
Wait, why Nginx instead of Apache2? Apache2 and Nginx are both excellent web servers that dominate the server software market. However, asynchronous web frameworks like FastAPI pair better with Nginx. Nginx is designed with an asynchronous event-driven architecture, allowing it to maximize FastAPI's asynchronous performance in high-concurrency environments. For this reason, the FastAPI community strongly recommends using Nginx as the web server in production environments, and this article will focus on Nginx.
Installing Nginx and Configuring Reverse Proxy
Why Should We Use Nginx?
-
Reverse Proxy: Application servers like FastAPI are not intended to receive external traffic directly. Nginx acts as a reverse proxy that receives webhook requests and securely forwards them to the FastAPI server.
-
Security: Nginx provides various security settings and DDoS attack mitigation features.
-
HTTPS Application: The management and application of HTTPS certificates are handled by web servers like Nginx.
Installing and Configuring Nginx
Connect to your staging server via SSH and install Nginx. I will assume that the readers of this article have some experience and knowledge about Nginx, so I will skip the detailed explanation of Nginx installation methods, file structure, and operational principles.
sudo apt update
sudo apt install -y nginx
sudo systemctl enable nginx # Automatically start on reboot
sudo systemctl start nginx # Start nginx
sudo systemctl status nginx # Check Active status
Now, let's create an Nginx configuration file to forward incoming requests to our FastAPI webhook server. Assume we are using a domain called deployer.example.com. Below is an example configuration.
#/etc/nginx/sites-available/deployer.example.com

# Redirect HTTP requests to HTTPS 308
server {
    listen 80;
    server_name deployer.example.com;
    return 308 https://$host$request_uri;
}

# Handle HTTPS requests
server {
    listen 443 ssl;
    server_name deployer.example.com;

    # Set SSL certificate path
    ssl_certificate /etc/letsencrypt/live/deployer.example.com/fullchain.pem;
    ssl_certificate_key /etc/letsencrypt/live/deployer.example.com/privkey.pem;
    ssl_session_cache shared:SSL:1m;
    ssl_session_timeout 5m;
    ssl_ciphers HIGH:!aNULL:!MD5;
    ssl_protocols TLSv1.2 TLSv1.3;

    location / {
        proxy_pass http://127.0.0.1:8000;
        proxy_set_header Host $host;
        proxy_set_header X-Real-IP $remote_addr;
        proxy_set_header X-Forwarded-For $proxy_add_x_forwarded_for;
        proxy_set_header X-Forwarded-Proto $scheme;
        proxy_redirect off;
    }
}
-
Configuration for HTTP Port 80: The
listen 80block withserver_nameset todeployer.example.compermanently redirects all incoming HTTP requests to HTTPS using thereturn 308 https://$host$request_uri;command. -
Configuration for HTTPS Port 443: The
listen 443 ssl;block handles HTTPS requests. -
ssl_certificate&ssl_certificate_key: This is written under the assumption that you have already obtained them through Let's Encrypt. Here, we specify the paths to the obtained SSL certificate and key files. These paths are automatically generated bycertbotwhen the certificate is issued. -
location /block: This sets up the reverse proxy to forward requests transformed to HTTPS to our FastAPI server (http://127.0.0.1:8000).
By restarting Nginx with this configuration file, all webhook requests will now be handled securely over HTTPS.
# Create a symbolic link to the sites-enabled directory for the configuration file
sudo ln -s /etc/nginx/sites-available/deployer.example.com /etc/nginx/sites-enabled/

# Check the syntax errors in the Nginx configuration file.
sudo nginx -t

# Restart Nginx to apply the changes.
sudo systemctl restart nginx
Applying HTTPS (Let's Encrypt + Certbot)
For security reasons, GitHub webhooks strongly recommend using HTTPS communication. Let's Encrypt is a nonprofit certificate authority that issues free SSL/TLS certificates to anyone, and Certbot is an excellent tool that automates certificate issuance and renewal. I will skip the installation method here.
Once successfully completed, access https://deployer.example.com from your browser to check the FastAPI API documentation (.../docs) or the / endpoint. If you see the message Webhook server is running!, the Nginx and HTTPS configuration is successfully completed.
Final Integration and Testing of GitHub Webhook
Now, everything is ready. Let's connect the automated deployment system we built to our GitHub repository.
-
Access the GitHub Repository: Go to the GitHub repository of the project where the automated deployment will be applied.
-
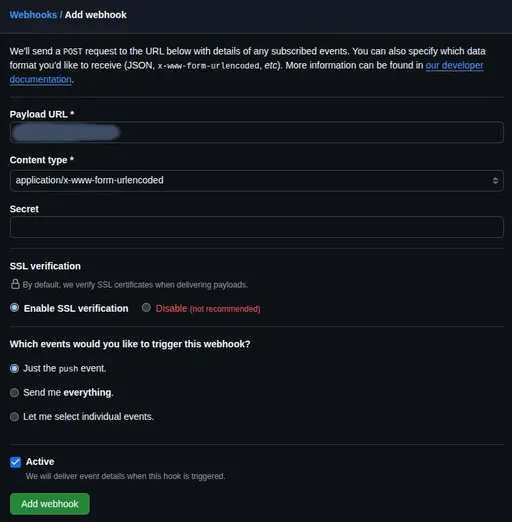
Webhook Settings: Click on
Settingsin the top menu, then on the left menu, clickWebhooks. -
Add Webhook: Click the
Add webhookbutton and enter the following information.-
Payload URL: Enter the address of the webhook server with Nginx and HTTPS applied. (e.g.,
https://deployer.example.com/webhook) -
Content type: Select
application/json. -
Secret: Copy and paste the value of
GITHUB_WEBHOOK_SECRETthat was set in the~/projects/webhook_server/.envfile in part 3. -
Which events would you like to trigger this webhook?: Select
Just the push event. -
Active: Ensure the checkbox is activated.
-
-
Save: Click the
Add webhookbutton to save the webhook.
If the webhook is registered successfully, a green check mark will appear in the Recent Deliveries section, confirming that the test request was sent successfully.
Now, let's conduct a final test.
-
Make Code Changes Locally: Slightly modify the project code, commit it to Git, and push the changes.
-
Check Status:
-
Go to the GitHub webhook settings page and check if the webhook for the recent push was successful (green check) in
Recent Deliveries. -
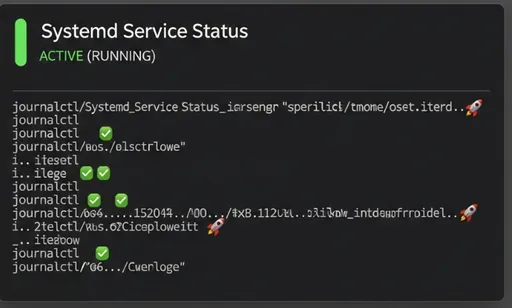
SSH into the staging server and use the command
sudo journalctl -u github-webhook-deployer.service -fto monitor real-time logs. If you see messages likeGit pull successful,Deployment task finished, it's a success. -
Check the status of the deployed Docker container to verify if the latest code has been applied.
-
In Conclusion: Automated Deployment System Complete!
Congratulations! You have successfully built a complete CI/CD pipeline that flows from your local development environment to GitHub and your self-built staging server.
Through this series, we have accomplished the following:
-
We understood why it is essential to build a webhook-based automated deployment system ourselves.
-
We designed and implemented the architecture of a webhook server using FastAPI.
-
We learned how to operate services reliably using Systemd.
-
We enhanced security through Nginx and HTTPS configuration.
-
Finally, we automated the entire process by integrating with GitHub.
Now, the moment you push the code, your server will reflect the latest changes without any intervention from you. Feel free to add more complex deployment logic or integrate notification features based on this system and evolve it in your unique way.
Thank you for joining me on this long journey!

There are no comments.