
Hello, developers! Are you sighing in frustration while observing your web service stutter due to heavy tasks? If fulfilling a single user request involves querying multiple databases, calling external APIs, and even processing images, our service is bound to get choppy. At this point, the hero that comes to the rescue is Celery.
Many of you might have already improved service responsiveness by handling background tasks with Celery. With just a line like some_long_running_task.delay(args), heavy tasks magically run in the background instead of blocking the main thread. However, not many have deeply explored the true identity and working principles of delay() hidden behind this convenience. Today, we will thoroughly dissect the delay() method, allowing you to elevate your Celery utilization skills to the next level.

1. Why is Celery Necessary?
Let's take a moment to revisit why Celery is essential. In web application development, we often face scenarios such as the following:
- Time-consuming tasks: Sending emails, processing images/videos, complex statistical calculations, bulk data imports/exports, etc.
- Dependency on external services: Potential response delays when calling external APIs.
- Sudden spikes in traffic: A chance that the web server may become overloaded with many requests in a short time.
If such tasks are executed directly on the main thread that processes user requests, users will have to wait until the tasks are completed. This increases response time and ultimately becomes a major factor that degrades user experience. In some cases, if server resources are scarce, or the task takes too long, it can lead to timeouts or even server crashes.
Celery is a Distributed Task Queue System designed to solve these problems. By processing requests that need immediate responses quickly and delegating time-consuming tasks to Celery for asynchronous processing in the background, we can enhance service responsiveness and ensure stability.
2. What is the delay() Method?
So, what exactly does the delay() method, which we frequently use, do?
delay() is the simplest way to schedule the asynchronous execution of Celery tasks.
The functions defined with the @app.task or @shared_task decorators are no longer just simple Python functions. They are wrapped into special Task objects by Celery, which then have methods like delay() and apply_async(). When you call the delay() method, your code instead of directly executing the task function, constructs a message consisting of the necessary information for task execution (function name, arguments, etc.) and sends it to Celery's Message Broker.
3. The Operating Principle of delay(): The Journey Behind the Magic
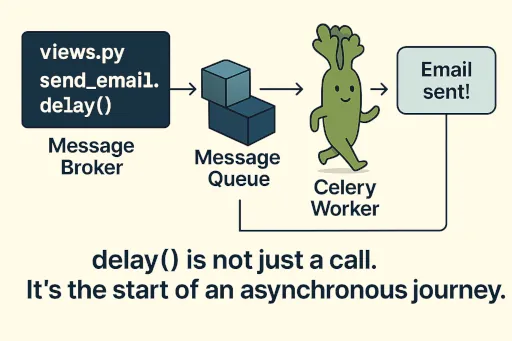
While delay() seems like magic allowing asynchronous tasks with just one line, a systematic operation process of Celery lies behind it. Here’s the sequence of events that happen when you call delay().
-
Task Call (
delay()call): In your main application code, like a Django view, you callmy_task_function.delay(arg1, arg2). -
Message Generation: The Celery client (the Django application) generates a Message indicating that the task
my_task_functionneeds to be executed with the argumentsarg1andarg2. This message is serialized in a standardized JSON or Pickle format containing the task's name, the arguments to be passed (args, kwargs), and any other metadata (e.g., task ID) if needed. -
Sending to Message Broker: The generated message is sent to Celery's Message Broker. The Message Broker is a message queue system like Redis, RabbitMQ, or Kafka. It stores this message in a specific Queue.
-
Worker Receives the Message: Celery Worker connects to the Message Broker and constantly polls or subscribes to messages from specific queues. When a new message arrives in the queue, the worker receives it.
-
Task Deserialization and Execution: The worker deserializes the received message to extract the task's name and arguments. Then it finds the corresponding task function (
my_task_function) and executes it independently within its own process or thread. -
Result Storage (optional): Once the task execution is completed, the result may be stored in Celery's Result Backend. Result backends can be Redis, databases (Django ORM), S3, etc. This result can later be retrieved via the
AsyncResultobject. -
Response from the View: While all these processes take place in the background, the main application (e.g., Django view) that called
delay()quickly responds to the client as soon as the task has been successfully added to the queue. Web requests are no longer blocked for long periods.
Thanks to this decoupled architecture, the web server can respond to requests quickly while delegating heavy tasks to Celery workers, significantly improving overall system performance and scalability.
4. Examples of Using delay()
Let’s look at a few common scenarios for using delay().
Example 1: Simple Email Sending Task
# myapp/tasks.py
from celery import shared_task
import time

@shared_task
def send_email_task(recipient_email, subject, message):
    print(f"Sending email to {recipient_email} - Subject: {subject}")
    time.sleep(5) # Simulate time delay for sending email
    print(f"Email sent to {recipient_email}")
    return True

# myapp/views.py
from django.http import HttpResponse
from .tasks import send_email_task

def contact_view(request):
    if request.method == 'POST':
        recipient = request.POST.get('email')
        sub = "Thank you for your inquiry."
        msg = "Your inquiry has been successfully received."

        # Asynchronously execute the email sending task
        send_email_task.delay(recipient, sub, msg)

        return HttpResponse("Your inquiry has been received and the email will be sent shortly.")
    return HttpResponse("This is the inquiry page.")
When a user submits the inquiry form, send_email_task.delay() is called, sending the email sending task to the background. The web server returns an immediate response, so the user does not need to wait for the email to be sent.
Example 2: Image Thumbnail Creation Task
# myapp/tasks.py
from celery import shared_task
import os
from PIL import Image # Requires Pillow library: pip install Pillow

@shared_task
def create_thumbnail_task(image_path, size=(128, 128)):
    try:
        img = Image.open(image_path)
        thumb_path = f"{os.path.splitext(image_path)[0]}_thumb{os.path.splitext(image_path)[1]}"
        img.thumbnail(size)
        img.save(thumb_path)
        print(f"Thumbnail created for {image_path} at {thumb_path}")
        return thumb_path
    except Exception as e:
        print(f"Error creating thumbnail for {image_path}: {e}")
        raise

# myapp/views.py
from django.http import HttpResponse
from .tasks import create_thumbnail_task

def upload_image_view(request):
    if request.method == 'POST' and request.FILES.get('image'):
        uploaded_image = request.FILES['image']
        # Save the image to a temp path (use storage like S3 in actual services)
        save_path = f"/tmp/{uploaded_image.name}"
        with open(save_path, 'wb+') as destination:
            for chunk in uploaded_image.chunks():
                destination.write(chunk)

        # Asynchronously execute the thumbnail creation task
        create_thumbnail_task.delay(save_path)

        return HttpResponse("Image upload and thumbnail creation is in progress in the background.")
    return HttpResponse("This is the image upload page.")
Even resource-intensive tasks like image uploads can be processed asynchronously using delay() to reduce the load on the web server.
5. Advantages and Limitations of delay()
Advantages:
- Concise and intuitive API: This is the biggest advantage.
delay()is very convenient for placing tasks into the queue without additional options. - Improved Responsiveness: By not blocking the web request processing thread and passing tasks to the background, users get quick responses.
- Scalability: Easily distribute workloads and adjust processing volume by increasing the number of workers as needed.
- Stability: Even if a specific task fails, it does not impact the entire web server. It allows for reliable processing with mechanisms like retries.
Limitations:
- Supports only simple options:
delay()is the most basic way to place tasks into the queue. It does not allow setting advanced options such as delaying task execution for a specific time, sending to a specific queue, or specifying priorities. For these situations,apply_async()must be used. - Simplicity of Error Handling: The
delay()call only returns whether the task was successfully placed in the queue. It does not provide immediate feedback about the success/failure of the actual task execution or its result. To check that, the result backend andAsyncResultobject must be used.
Conclusion
Today, we thoroughly explored the operating principles and uses of the delay() method, which is central to Celery. I hope the understanding of delay() has become the key to understanding how Celery's distributed task queue system operates beyond just being a convenient syntax.
In the next post, we will dive deeply into the apply_async() method, which can be seen as a more powerful alternative to delay(), providing clear guidelines on the relationship between the two methods and when to use each. Stay tuned!


There are no comments.