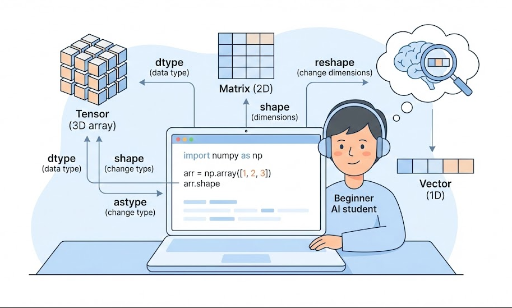
NumPy ndarray入門:array、dtype、shape、reshape、astype
1. なぜndarrayから始めるのか?

ディープラーニングを学んでいくと、こんなコードに何度も出会います。
- 入力テンソルの
shapeを確認する - バッチ処理のために
reshapeを使う - GPU演算のために
float32に変換する…
こうした操作の土台にあるのが NumPy の ndarray です。
- PyTorch の
Tensorは、概念的には NumPy の ndarray にかなり近い構造 - ディープラーニングモデルの入力・重み・出力はすべて多次元配列(=テンソル)
したがってndarrayを理解すること=テンソル演算の基本文法を学ぶことと考えられます。
2. ndarrayとは?
ndarray は N 次元配列、つまり N 次元の配列を表します。
- 1次元:ベクトル
- 2次元:行列
- 3次元以上:テンソル(画像バッチ、時系列、動画など)
簡単な例:
import numpy as np

x = np.array([1, 2, 3])            # 1次元(ベクトル)
M = np.array([[1, 2], [3, 4]])     # 2次元(行列)

print(type(x))          # <class 'numpy.ndarray'>
print(x.ndim, x.shape)  # 次元数、形状
print(M.ndim, M.shape)
ndim:何次元かshape:各次元のサイズ
3. PyTorch Tensorとの類似性
PyTorchテンソルも結局は「多次元配列」です。
import torch

x_np = np.array([[1, 2], [3, 4]])   # NumPy ndarray
x_torch = torch.tensor([[1, 2], [3, 4]])  # PyTorch Tensor

print(type(x_np))      # numpy.ndarray
print(type(x_torch))   # torch.Tensor

print(x_np.shape)      # (2, 2)
print(x_torch.shape)   # torch.Size([2, 2])
共通点:
- どちらも「多次元数値配列」
shape、reshape、dtypeの概念がほぼ同じ- 演算も似ている(
+、*、@など)
主な違い(ディープラーニングで重要):
- NumPy:CPU、自動微分なし
- PyTorchテンソル:GPU使用可、自動微分サポート
したがって、一般的には次のように使います。
- 概念演習 / 数式実験 / データ操作 → NumPy
- 実際のモデル学習 → PyTorch
NumPyのndarrayに慣れるほど、PyTorchテンソル演算が自然に感じられます。
4. np.array:ndarrayを作る基本的な方法
ndarrayを作る最も基本的な関数がnp.arrayです。
4.1 Pythonリスト → ndarray
import numpy as np

# 1次元配列(ベクトル)
x = np.array([1, 2, 3])
print(x)
print(x.ndim)   # 1
print(x.shape)  # (3,)

# 2次元配列(行列)
M = np.array([[1, 2, 3],
              [4, 5, 6]])
print(M)
print(M.ndim)   # 2
print(M.shape)  # (2, 3)
- Pythonのリスト/リストのリストを
np.arrayに渡すとndarrayが生成されます。 - ディープラーニングでよく見る
batch_size x feature_dim行列も結局この形です。
4.2 初期値を素早く作る
学習用サンプルや実験では、乱数や 0 で埋めた配列を手早く用意することが多いです。
zeros = np.zeros((2, 3))       # 2x3行列、全て0
ones = np.ones((2, 3))         # 2x3行列、全て1
randn = np.random.randn(2, 3)  # 正規分布乱数

print(zeros.shape)  # (2, 3)
このパターンはPyTorchでもほぼ同じです。
import torch

zeros_t = torch.zeros((2, 3))
ones_t = torch.ones((2, 3))
randn_t = torch.randn((2, 3))
5. dtype:数値の「データ型」を理解する
dtype は data type の略で、「この配列の要素がどの型か」を示します。
よく見かけるもの:
int32、int64:整数型float32、float64:実数型(浮動小数点)
確認してみましょう。
x = np.array([1, 2, 3])
print(x.dtype)  # 通常 int64 か int32

y = np.array([1.0, 2.0, 3.0])
print(y.dtype)  # 通常 float64
5.1 dtypeを指定して作る
x = np.array([1, 2, 3], dtype=np.float32)
print(x.dtype)  # float32
ディープラーニングでは、float32(PyTorchのtorch.float32)を多用します。
GPU演算に適しており、メモリ使用量も適度だからです。
6. shape:データの「形」を読む
shapeは配列の形(各次元のサイズ)を表すタプルです。
import numpy as np

x = np.array([1, 2, 3])
print(x.shape)  # (3,)

M = np.array([[1, 2, 3],
              [4, 5, 6]])
print(M.shape)  # (2, 3)
ディープラーニングで頻出するshape例:
- 特徴ベクトル1つ:
(feature_dim,)→ 例:(3,) - バッチデータ:
(batch_size, feature_dim)→ 例:(32, 3) - 画像バッチ(PyTorch標準):
(batch_size, channels, height, width)例:(32, 3, 224, 224)
NumPyでこうしたshapeを先に触って慣れておくと、PyTorchテンソルのshapeエラーに直面したときも原因をすぐに特定できます。
7. reshape:形を変える
reshape は、要素数はそのままに形状だけを変える操作です。
import numpy as np

x = np.array([1, 2, 3, 4, 5, 6])
print(x.shape)  # (6,)

M = x.reshape(2, 3)
print(M)
print(M.shape)  # (2, 3)
重要ポイント:
reshape前後の総要素数は同じでなければならない。- 上記例では6個要素 → (2 x 3) = 6個 → OK
7.1 -1を使って自動計算
バッチや画像処理では-1をよく使います。
-1は「この位置は自動で計算してくれ」という意味です。
x = np.array([[1, 2, 3],
              [4, 5, 6]])  # shape: (2, 3)

# 全体を1次元に展開(flatten)
flat = x.reshape(-1)        # shape: (6,)
print(flat)

# 再び2行にし、列は自動計算
M = flat.reshape(2, -1)     # shape: (2, 3)
print(M)
PyTorchでもほぼ同様に使えます。
import torch

x_t = torch.tensor([[1, 2, 3],
                    [4, 5, 6]])  # (2, 3)

flat_t = x_t.reshape(-1)        # (6,)
M_t = flat_t.reshape(2, -1)     # (2, 3)
reshapeに慣れると、
- CNNでfeature mapをflatten
- RNN/LSTM入力を(batch, seq_len, feature)形に整形
- バッチ次元を前後に移動
などが直感的に行えます。
8. astype:dtypeを変える
astypeは配列のデータ型を変える関数です。
import numpy as np

x = np.array([1, 2, 3])      # int型
print(x.dtype)               # int32 or int64

x_float = x.astype(np.float32)
print(x_float)
print(x_float.dtype)         # float32
ディープラーニングでよく使うケース:
- 整数ラベルを実数型に変えてloss計算
float64で入ってきたデータをfloat32に統一- PyTorchに渡す前に型合わせ
例:
import torch
import numpy as np

x = np.array([1, 2, 3], dtype=np.int32)
x = x.astype(np.float32)              # float32に変換
x_torch = torch.from_numpy(x)         # テンソルに変換
print(x_torch.dtype)                  # torch.float32
型が揃っていないと、PyTorch の演算中に Expected Float but got Double のような型エラーが出ることがあります。
9. まとめ:今日学んだndarrayの基本文法
今回扱った内容は以下の通りです。
ndarrayとは? * ディープラーニングで扱うすべてのデータ構造の基礎である「多次元配列」- PyTorch
Tensorとの関係 * 概念的にほぼ同じ、ディープラーニング版のndarray np.array* Pythonリスト/リストのリストからndarrayを生成dtype* 数値型(整数/実数、32/64bit)を表すshape* データの形状、ディープラーニングで最も頻出の属性reshape* 要素数は保ったまま形を変える(-1で自動計算)astype* データ型を変換(int→float32など)
これらの4つ(array、dtype、shape、reshape、astype)をしっかり身につければ、
- テンソル形状エラーに直面しても慌てずに対処できる
- 論文の数式とコードを行き来しやすくなる
- PyTorchチュートリアルの例題をスムーズに追える


コメントはありません。