1. Introduction: It’s Time to Tweak the Code

Hello! In the first part, we discussed why we should build an automated deployment system using GitHub Webhook and the necessary preparations. In the second part, we took a detailed look at the overall architecture and the core role of the FastAPI webhook service. Now, it's time to transfer the image we've painted in our minds into actual code.
If you haven't seen the previous parts, you can check them out via the links below.
Building Your Own Automated Deployment System with GitHub Webhook
1 - Why Build It Yourself? 2 - Overall Architecture and Process Design
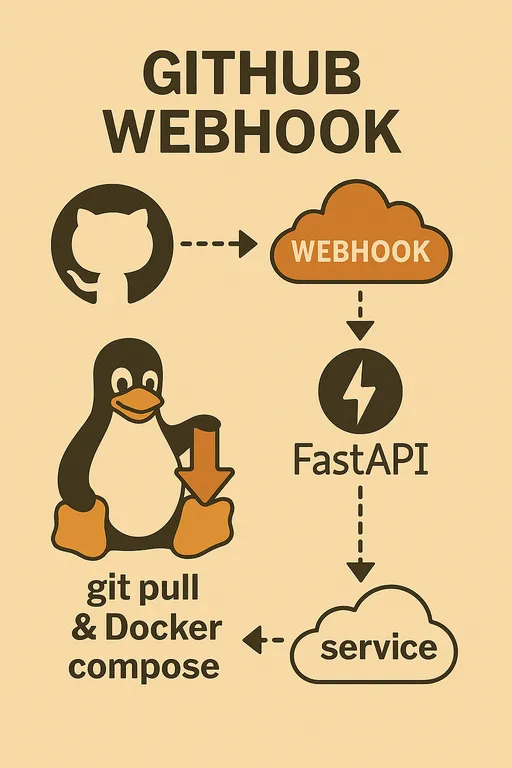
In this third part, we will finish the basic environment setup for the staging server and create the basic skeleton of the FastAPI webhook server that can safely receive and verify GitHub Webhook requests. This is a moment where the automated deployment system, which seemed vague, comes one step closer to reality!
2. Initial Environment Setup for Staging Server
The first thing to do is to prepare the environment of the staging server where the deployment will occur, so we can run our code. Please SSH into the server and follow the steps below.
2.1. Preparing the Python Development Environment
Setting up a Python virtual environment on the server is a good practice to prevent dependency conflicts between projects and to maintain a clean development environment. Install the necessary packages with pip in the venv environment.
# Install FastAPI, Uvicorn, and python-dotenv to read .env files
pip install fastapi uvicorn python-dotenv
2.2. Confirming Git, Docker, and Docker Compose Installation
As mentioned in the last part, Git, Docker, and Docker Compose are essential tools for automated deployment. I assume that readers who are reading this article already have these tools installed on their server.
If they are not installed, please check their installation using the following commands.
git --version
docker --version
docker compose version # or docker-compose --version (depending on the installation method)
If they are not installed, please refer to the official documentation of each tool to proceed with the installation. If you need a detailed guide on Docker installation, you can refer to the following article: Docker Installation Guide
Note: After installing Docker, you must grant Docker group permission to the current user and log out and log back in to use the docker command without sudo.
sudo usermod -aG docker $USER
After granting Docker permission, you must log out and log back into the server for the changes to take effect. Please check that the docker run hello-world command works without sudo.
3. Creating the Basic Structure of the FastAPI Webhook Server
Now, let's create the basic framework of the FastAPI application that will accept webhook requests. Create a main.py file inside the ~/projects/webhook_server directory and write the following code.
3.1. Creating the main.py File and Initializing the FastAPI App
For the sake of explanation, I wrote all the logic in main.py at once, but you should organize each utility function into separate files for better management and import them in your actual projects, so it looks good according to your style. Below is an example of how to write it.
# ~/projects/webhook_server/main.py
import hmac
import hashlib
import os
import logging
import subprocess
from pathlib import Path
from typing import Optional

from fastapi import FastAPI, Request, HTTPException, BackgroundTasks
from dotenv import load_dotenv, dotenv_values

# Load .env file (to use environment variables)
load_dotenv()

# Logging setup
logging.basicConfig(
    level=logging.INFO, # Log information with level INFO and above
    format='%(asctime)s - %(levelname)s - %(message)s',
    handlers=[
        logging.FileHandler("webhook_server.log"), # Save logs to file
        logging.StreamHandler() # Log to console as well
    ]
)
logger = logging.getLogger(__name__)

app = FastAPI()

# Load GitHub Webhook Secret from environment variable
GITHUB_WEBHOOK_SECRET = os.getenv("GITHUB_WEBHOOK_SECRET")

# Test root endpoint: It’s recommended to remove this for security in production.
# Once exposed to the internet, there’s no need to let various crawlers know that this endpoint exists.
@app.get("/")
async def read_root():
    return {"message": "Webhook server is running!"}

# Endpoint to receive GitHub Webhook
@app.post("/webhook")
async def github_webhook(request: Request, background_tasks: BackgroundTasks):
    logger.info("Webhook request received.")

    # 1. Verify GitHub Webhook Secret (This is the first security step)
    if GITHUB_WEBHOOK_SECRET:
        signature = request.headers.get("X-Hub-Signature-256")
        if not signature:
            logger.warning("Signature header missing. Aborting.")
            raise HTTPException(status_code=401, detail="X-Hub-Signature-256 header missing")

        body = await request.body()
        expected_signature = "sha256=" + hmac.new(
            GITHUB_WEBHOOK_SECRET.encode('utf-8'),
            body,
            hashlib.sha256
        ).hexdigest()

        if not hmac.compare_digest(expected_signature, signature):
            logger.warning("Invalid signature. Aborting.")
            raise HTTPException(status_code=401, detail="Invalid signature")
        else:
            logger.info("Signature verified successfully.")
    else:
        logger.warning("GITHUB_WEBHOOK_SECRET is not set. Skipping signature verification (NOT RECOMMENDED FOR PRODUCTION).")


    # 2. Parse HTTP Body (Payload)
    try:
        payload = await request.json()
        event_type = request.headers.get("X-GitHub-Event")
        # Extract the repository name from the GitHub Webhook payload.
        # Use 'name' instead of 'full_name'.
        repo_name = payload.get("repository", {}).get("name", "unknown_repository")
        ref = payload.get("ref", "unknown_ref")
        pusher_name = payload.get("pusher", {}).get("name", "unknown_pusher")

        logger.info(f"Event: {event_type}, Repo: {repo_name}, Ref: {ref}, Pusher: {pusher_name}")

        # Run the actual deployment logic in the background
        background_tasks.add_task(handle_deploy, repo_name)

    except Exception as e:
        logger.error(f"Error parsing webhook payload or processing request: {e}")
        raise HTTPException(status_code=400, detail=f"Error processing request: {e}")

    # Immediately return a response to GitHub
    return {"message": "Webhook received and processing started in background!"}

# Function to handle the actual deployment logic
def handle_deploy(repo_name: str):
    # Skip the repository named 'deployer' as it updates the webhook server itself
    if repo_name == "deployer":
        logger.info("⚙️ Deployer self-update skipped.")
        return

    # Read the local path of each repository from environment variables.
    # This dictionary should map your actual project names to paths on the server.
    # E.g., the path for SAMPLE_PROJECT_1 should be stored in the SAMPLE_PROJECT_1_PATH environment variable.
    repo_paths = {
        "sample_project1": os.getenv("SAMPLE_PROJECT_1_PATH"),
        "sample_project2": os.getenv("SAMPLE_PROJECT_2_PATH"),
        "sample_project3": os.getenv("SAMPLE_PROJECT_3_PATH"),
    }

    # It’s also recommended to remap project names if the repository and Docker Compose project names are different.
    # This way, you can use the -p (project name) option of Docker Compose.
    # Note that due to Docker limitations, uppercase letters and hyphens cannot be used in the -p option.
    p_name = {
        "sample_project1": "p_name_1",
        "sample_project2": "p_name_2",
        "sample_project3": "p_name_3",
    }

    # Find the local path of the repository that received the webhook request.
    repo_path: Optional[str] = repo_paths.get(repo_name)

    # If it’s an undefined repository, log a warning and exit.
    if not repo_path:
        logger.warning(f"🚫 Unknown repository: {repo_name}")
        return

    # Convert to a Path object for easier file system path handling.
    repo_path = Path(repo_path)

    # Load DEBUG and COLOR values from the .env file of the repository.
    # This can be used to distinguish between development and production environments by project, or dynamically set the Docker Compose project name.
    env_path = repo_path / ".env"
    env_vars = dotenv_values(env_path) if env_path.exists() else {}
    is_debug = env_vars.get("DEBUG", "false").lower() == "true" # Convert "true" string to boolean
    deploy_color = env_vars.get("COLOR", "red") # Default is "red"
    project_name = str(deploy_color) + p_name.get(repo_name, repo_name) # Docker Compose project name

    # You may determine the Docker Compose file to use based on the DEBUG value.
    docker_compose_file = "docker-compose.dev.yml" if is_debug else "docker-compose.prod.yml"

    # Define the path to the Docker Compose file.
    compose_file = repo_path / docker_compose_file

    logger.info(f"Pulling latest code for {repo_name} in {repo_path}...")
    # Execute Git Pull: Fetch the latest code from the corresponding repository path.
    # The check=True option raises a subprocess.CalledProcessError if the command fails, aiding in exception handling.
    try:
        subprocess.run(["git", "-C", repo_path, "pull"], check=True, capture_output=True, text=True)
        logger.info(f"Git pull successful for {repo_name}.")
    except subprocess.CalledProcessError as e:
        logger.error(f"Git pull failed for {repo_name}: {e.stderr}")
        return # Exit here if deployment fails

    logger.info(f"Checking for changes in {repo_name} to decide rebuild...")
    # Compare changes: Determine if a Docker image rebuild is necessary.
    changed = should_rebuild(repo_path)

    try:
        if changed:
            logger.info(f"🚀 Changes detected. Building and deploying {repo_name} with {docker_compose_file}...")
            # If there are changes, run Docker Compose with the --build option to rebuild the image.
            subprocess.run(["docker", "compose", "-p", project_name, "-f", compose_file, "up", "-d", "--build"], check=True, capture_output=True, text=True)
            logger.info(f"Docker compose build and up successful for {repo_name}.")
        else:
            logger.info(f"✨ No significant changes. Deploying {repo_name} without rebuilding images using {docker_compose_file}...")
            # If there are no changes, run Docker Compose without the --build option.
            subprocess.run(["docker", "compose", "-p", project_name, "-f", compose_file, "up", "-d"], check=True, capture_output=True, text=True)
            logger.info(f"Docker compose up successful for {repo_name}.")
    except subprocess.CalledProcessError as e:
        logger.error(f"Docker compose failed for {repo_name}: {e.stderr}")
        return # Exit here if deployment fails

    logger.info(f"✅ Deployment task for {repo_name} finished.")

# Function to determine if a Docker image rebuild is required
def should_rebuild(repo_path: Path) -> bool:
    # These files, if changed, will trigger a Docker image rebuild.
    trigger_files = [
        "requirements.txt", "Dockerfile", "Dockerfile.dev", "Dockerfile.prod",
        ".dockerignore", ".env" # Include changes to .env file as rebuild triggers
    ]

    logger.info(f"Checking git diff for {repo_path}...")
    # Use Git diff to obtain a list of changed files between HEAD~1 (previous commit) and the current HEAD.
    # The --name-only option fetches only the names of changed files.
    try:
        result = subprocess.run(
            ["git", "diff", "--name-only", "HEAD~1"],
            cwd=repo_path,
            capture_output=True, text=True, check=True
        )
        changed_files_in_git = result.stdout.strip().splitlines()
        logger.info(f"Changed files in git: {changed_files_in_git}")
    except subprocess.CalledProcessError as e:
        logger.error(f"Git diff failed for {repo_path}: {e.stderr}")
        # It’s safer to attempt a rebuild even if Git diff fails.
        return True

    # Check if any trigger files are included in the changed file list.
    if any(f in changed_files_in_git for f in trigger_files):
        logger.info("Detected trigger file changes via git diff. Rebuild required.")
        return True

    # Check if a manual rebuild trigger file (REBUILD_TRIGGER) exists.
    # If this file exists, it’s considered a manual request for a rebuild, so delete it.
    rebuild_trigger_file = repo_path / "REBUILD_TRIGGER"
    if rebuild_trigger_file.exists():
        try:
            rebuild_trigger_file.unlink() # Delete the file
            logger.info("Detected REBUILD_TRIGGER file. Rebuild required and trigger file removed.")
            return True
        except Exception as e:
            logger.error(f"Error removing REBUILD_TRIGGER file: {e}")
            # It’s also safe to attempt a rebuild if file deletion fails.
            return True

    logger.info("No rebuild trigger files found. No rebuild required.")
    return False
3.2. Defining the /webhook Endpoint
The asynchronous function github_webhook, defined under the app.post("/webhook") decorator in the above code, is the endpoint that will receive GitHub Webhook requests. This function processes incoming POST requests and can access the headers and body (Payload) through the Request object. BackgroundTasks is a powerful feature of FastAPI that helps execute time-consuming tasks like deployment in the background while immediately responding to GitHub.
4. Implementing GitHub Webhook Secret Verification Logic
The most crucial security element in the above code is the verification logic using GITHUB_WEBHOOK_SECRET.
4.1. The Importance of the Secret Value
When setting up GitHub webhooks, you can set a Secret value. This value is used by GitHub to create a hash value by combining the request body with the Secret value when sending the webhook request, which is sent in the X-Hub-Signature-256 header. Our webhook server generates a hash value in the same way and compares it with the hash value sent by GitHub to verify that the request came from GitHub and that the data wasn't tampered with during transmission.
4.2. Verification Using the X-Hub-Signature-256 Header
As you saw in the code, we perform Secret verification using the hmac and hashlib modules.
- Setting the Secret: First, create a
.envfile in the~/projects/webhook_serverdirectory and write the Secret value you’ll use for GitHub Webhook setup. Make sure to add this file to.gitignoreto prevent it from being included in the Git repository. This Secret value will be used later in the Webhook settings of your GitHub Repository.
# ~/projects/webhook_server/.env
GITHUB_WEBHOOK_SECRET="Enter_the_secret_value_used_for_GitHub_webhook_setup_here"
- FastAPI Code: In
main.py, use thepython-dotenvlibrary to load this.envfile and retrieve theGITHUB_WEBHOOK_SECRETvalue withos.getenv(). Then, every time a webhook request comes in, fetch the signature value withRequest.headers.get("X-Hub-Signature-256")and use thehmac.new()function to calculate and compare the expected signature value.
This verification logic is an essential shield against external attacks on the webhook endpoint, so do not skip it!
5. Setting Up the Logging System
You can see that I’ve set up basic logging using the logging module in the code.
logging.basicConfig(
    level=logging.INFO,
    format='%(asctime)s - %(levelname)s - %(message)s',
    handlers=[
        logging.FileHandler("webhook_server.log"), # Save to webhook_server.log file
        logging.StreamHandler() # Also output to console
    ]
)
logger = logging.getLogger(__name__)
With this setup, each time a webhook request comes in, information is logged in the webhook_server.log file, and it’s also outputted to the terminal. Later, as the deployment logic becomes more complex, this logging feature will help you easily pinpoint where issues arise.
6. Running the Webhook Server with Uvicorn and Local Testing
Now, let's do a quick local test to see if the FastAPI webhook server we’ve written is working correctly. In the ~/projects/webhook_server directory on the staging server, with the virtual environment activated, execute the following command.
# Check if the virtual environment is activated (look for (venv) in the prompt)
# source venv/bin/activate # If not activated, rerun this command

uvicorn main:app --host 0.0.0.0 --port 8000 --reload
The `--reload` option automatically restarts the server when code changes during development, which is convenient.
Access 127.0.0.1:8000/docs in your browser to check if the API documentation has been generated correctly. If the documentation is confirmed, the application is up and running. If you know the server's IP address (e.g., 192.168.1.100), you can test it by sending a request using the following curl command from your local machine.
# Replace 'YOUR_SERVER_IP' with the server's IP address.
# Replace 'YOUR_WEBHOOK_SECRET' with the actual value from the .env file.

# Includes simple dummy JSON data.
curl -X POST http://YOUR_SERVER_IP:8000/webhook \
     -H "Content-Type: application/json" \
     -H "X-GitHub-Event: push" \
     -H "X-Hub-Signature-256: sha256=$(echo -n '{"repository":{"name":"your-repo"},"ref":"refs/heads/main","pusher":{"name":"test-user"}}' | openssl dgst -sha256 -hmac 'YOUR_WEBHOOK_SECRET' | awk '{print $2}')" \
     -d '{"repository":{"name":"your-repo"},"ref":"refs/heads/main","pusher":{"name":"test-user"}}'
Check to see if the message Webhook received and processing started in background! appears in the terminal along with logging output, and confirm that it is also recorded in the server log file (webhook_server.log). If any errors occur, you can debug through the error messages displayed in the terminal.
7. Conclusion: Preview of the Next Part
In this part, we have built the environment of the staging server and completed the basic skeleton of the FastAPI webhook server that can safely receive and verify GitHub Webhook requests. The webhook server is now ready to accept external requests safely.
In the next fourth part, we will implement the actual deployment logic (Git Pull, determining Docker image rebuild, executing Docker Compose) using the subprocess module on the foundation we built today, and detail how to register this FastAPI webhook server as a Systemd service to automatically execute on server reboot. Stay tuned!


There are no comments.