
Initially, I was using a Nextcloud server that I built myself. I was particularly impressed with the Notes feature of Nextcloud, so I created a Obsidian Vault in the Notes subdirectory on my PC and started writing various documents.
It was simple on the PC version of Obsidian. I just needed to place the Vault in the Nextcloud sync folder.
However, the problem started with the iPhone.
Unexpected Limitations of Obsidian for iPhone
I learned that there was an Obsidian app for iPhone and installed it right away... However, the issue was that Obsidian for iPhone only officially supports iCloud and Obsidian’s own cloud, and does not support integration with Nextcloud.
It didn't have the "import folder" feature like on the PC.
"Wouldn't it work if I just imported the files using the Nextcloud app?"
I thought so at first, but Obsidian requires you to import into a local vault to function properly, so simple file access was not possible.
Solution: Using the Remotely Save Plugin
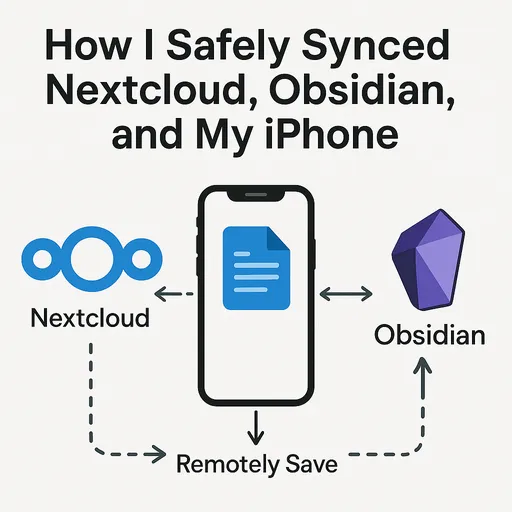
After searching extensively, I discovered the community plugin for Obsidian called Remotely Save.
This plugin allows you to safely sync data to an external server (in this case, Nextcloud) using WebDAV.
However, the setup process was quite complex. 😅
Summary of Remotely Save Setup (for iPhone)
-
Install the Plugin
- In the Obsidian iPhone app, go to Settings → Community plugins → Browse → Search for
Remotely Saveand install it.
- In the Obsidian iPhone app, go to Settings → Community plugins → Browse → Search for
-
Activate the Plugin
- After installation, enable it.
-
Input WebDAV Settings
- WebDAV URL:
https://your-nextcloud-domain/remote.php/dav/files/your-username/ - Username: Nextcloud username
- Password: Nextcloud login password (or app password)
- WebDAV URL:
-
Initial Sync Setup
- After entering the settings, make sure to click the Check Connectivity button to verify the connection.
- If the connection is confirmed successfully, return to the main screen and manually execute the
Remotely Save: Synccommand from the command palette at the bottom of Obsidian. - This process allows you to complete the initial data sync between the server and the iPhone.
⚠️ An important point here is the URL. If you follow the above example, a new vault created on the iPhone will appear at the root of Nextcloud. Thus, if there is already a location for the Obsidian vault, such as /Nextcloud/Notes/myvault/, with existing content, you need to use that. In other words, the WebDAV URL must be
https://your-nextcloud-domain/remote.php/dav/files/your-username/Notes/, and the vault name on the iPhone must match the PC’s vault name.
- Results When I executed the sync command, I was a bit tense. Would there be a conflict since the vault location and name on the iPhone were the same as on the PC? Or would a newly created empty vault on the iPhone affect the existing data on the PC and cause everything to disappear? I was worried. However, the result was that the iPhone successfully pulled data from the PC, and the PC's data was perfectly synced to the iPhone without any loss.
Lessons Learned After Some Trial and Error
- Since Obsidian is fundamentally based on "file system" access, a slightly different approach is needed on the iPhone.
- To properly use Nextcloud, it's essential to utilize plugins that support WebDAV.
- The Remotely Save plugin setup is complicated, but once successful, it operates quite reliably.
Closing Tips
- On the iPhone, managing storage space is also crucial. Syncing too many files at once can slow down the app.
- If you want file versioning, make sure to enable Nextcloud's versioning feature.
I hope this article is a small help for those who want to use Nextcloud + Obsidian + iPhone like I do. 🙌
If I learn better setup methods in the future, I will update this!

There are no comments.