Desktop System Fan Replacement Review: What a Server Admin Learned by Doing It Yourself
I had a desktop that I used as a secondary server. The problem was fan noise. I’m sensitive to noise, so the fan’s hum was a constant source of stress, echoing in my ears all day.
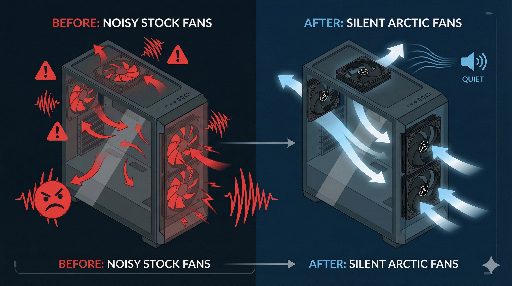
One day I found an ARCTIC P12 5‑pack on sale for about $15 and bought it immediately. The original fans were ABKO bundle fans—cheap, noisy, and especially irritating with their high‑frequency, sharp whine.
After swapping to the P12, my first impressions were:
- At base RPM, the noise was almost non‑existent.
- When I cranked the fans hard, I still heard a blowing‑air pressure sound similar to a regular fan at high speed.
- With PWM speed control, I could set them to a level that was practically near‑silent.
This post is based on that experience, aimed at anyone who runs a desktop like a server: how to evaluate and replace fans.
1. Why I Decided to Replace the Fans: The Limits of Bundle Fans

The default fans were ABKO bundle fans. Functionally they worked, but for a machine that stays on 24/7 like a server, they had several issues:
- Even at low RPM, they produced constant audible noise.
- The unnecessary RGB lighting created a distracting ambience.
- Under load, the RPM rose and a harsh “kik‑kik‑kik” mechanical sound became prominent.
Bundle fans are usually chosen for cost, so you can’t expect great durability, noise, or bearing quality. I decided it was time to replace the entire fan set.
2. Fan Size: Check 120mm vs 140mm First
Before buying, the first thing to verify is the size (specification).
Most cases are designed for:
- 120 mm (12 cm)
- 140 mm (14 cm)
Not every slot supports both sizes. Before ordering, check:
- Which fan sizes are supported on the front, top, and rear.
- Whether the screw holes are 120 mm‑only or 120/140 mm‑compatible.
If the size doesn’t match, the fan won’t fit at all, so size is the first checkpoint.
3. Power Connection: PSU Direct vs Motherboard Header
After mounting, deciding where to plug the fan is crucial. There are two main options.
3‑1. Direct PSU Connection (Molex, etc.)
- Connect the wires and the fan runs.
- No speed control → always max RPM.
- Cheap RGB or bundle fans often use this method.
- Not recommended for long‑term server use: constant full speed increases noise and reduces lifespan.
3‑2. Motherboard FAN Header (PWM/DC control)
- Headers like
CPU_FAN,CHA_FAN,SYS_FAN,FAN1,FAN2. - RPM can be finely controlled via BIOS or tools like
fancontrol. - Automatic curves based on temperature are possible.
- For a quiet server/desktop, this is essential.
In this replacement, all fans were connected through the motherboard header (or a hub), allowing a balance between noise and temperature.
4. If It’s a Server, Drop the RGB
Today most case fans come with RGB. For a server‑style desktop, RGB is almost meaningless:
- It’s distracting.
- It consumes extra power.
- It only raises the price.
From a server perspective, a fan should be:
“Quiet, long‑lasting, and stable.”
So I chose the ARCTIC P12 non‑RGB model.
- 5‑pack for about $15.
- PWM‑enabled.
- Excellent airflow and pressure for the noise level.
The price‑to‑satisfaction ratio was high, and it passed my noise‑sensitivity threshold.
5. Motherboard Fan Header and Hub Setup
Motherboards usually have 2–3 SYS/CHA FAN headers. If you want more than five fans, you’ll need additional hardware.
Options:
- Fan hub or
- Y‑cable (splitter)
Both allow multiple fans to be tied to a single header.
My actual setup was roughly:
FANS2→ Three front intake fansFANS1→ Two top exhaust fans
In other words, fans were grouped by role for control.
- Front group: intake cold air into the case.
- Top group: exhaust hot air out.
Grouping makes it easy to:
- Lower intake/exhaust speeds separately when noise matters.
- Apply different fan curves per group.
6. The Most Important Point When Installing Fans: Direction (Intake/Exhaust)
The most common mistake is getting the direction wrong.
Basic Rule
- The side that looks smooth and attractive → intake (IN).
- The side that shows the back support (grid) → exhaust (OUT).
Think of a regular fan: air comes out the front, the motor and support are at the back.
In a case:
- Front fans must be intake (IN).
- Rear/Top fans must be exhaust (OUT).
If you accidentally install a front fan as exhaust or a top fan as intake, the fans will pull and push air against each other, creating turbulence and more noise.
7. Intake vs Exhaust Ratio: A “Light Positive Pressure” of ~3:2 Is Ideal
Adding more fans doesn’t automatically mean better. The key is ratio and direction.
A typical desktop/server case works well with:
- Front: Intake (IN)
- Rear/Top: Exhaust (OUT)
- Number of fans: Intake slightly more than exhaust (e.g., 3:2)
This creates a slight positive pressure inside the case, reducing dust ingress and allowing air to flow naturally from front to back and bottom to top, which also lowers noise.
Initially I had more exhaust fans, which caused the fans to fight each other, producing a buzzing noise and unnecessary RPM spikes. Increasing intake and reducing exhaust made the noise much smoother at the same RPM.
8. Real Noise Changes and Fan Curve Tuning
After switching to ARCTIC P12, the perceived change was dramatic.
- Light tasks (IDLE, casual work)
- Low RPM keeps the fan almost near‑silent.
- Even at night, it’s not bothersome.
- Load situations (builds, inference, etc.)
- A slightly aggressive curve introduces a pressure sound similar to a high‑speed fan, but it’s just airflow, not a harsh high‑frequency metal noise.
Quick tuning tips:
- Set the PWM range 40–60% as the “normal use” band.
- Adjust the curve within that band to balance temperature vs. noise.
- Keep the maximum RPM only for brief spikes when temperature rises.
With this setup, the fan runs unnoticed most of the time, and when it does get louder under load, it’s just a brief reminder that something is happening.
9. Wrap‑Up: It’s a Pain but Not Hard
At first, fan replacement seemed tedious and difficult, but in practice it’s not that hard. If you’re not confused about the airflow direction, it’s quick and simple.
Key takeaways:
- Check fan size (120 mm/140 mm).
- Confirm motherboard header compatibility.
- Set intake/exhaust direction correctly.
- Design airflow with an intake > exhaust ratio (~3:2).
- Tune PWM via BIOS or fan control tools.
- ARCTIC P12 ×5 for about $15—very quiet.
- Consider a small ratchet driver before heavy GPU/CPU work to avoid stress.
After swapping from the noisy ABKO bundle to the quiet ARCTIC P12, my secondary machine—kept on like a server—became a quiet, non‑intrusive work server.
If you’re hesitating, give it a try. Once you experience it, you’ll have a clear mental model of fan configuration and airflow for future builds or server additions.

There are no comments.