A Hands‑On Guide to Load Balancing with Nginx
Many developers use Nginx only as a “reverse proxy + static file server,” but it’s actually a powerful software load balancer. If you manage your own servers, mastering Nginx can dramatically improve both reliability and performance during traffic spikes.
This article is aimed at beginner‑to‑intermediate developers and covers:
- What load balancing is
- How to configure Nginx for load balancing
- Algorithms (round‑robin, least_conn, ip_hash, etc.)
- Health checks
- Frequently used options
1. What is Load Balancing?

Load balancing simply means:
Distributing requests evenly across multiple servers so that no single server becomes overloaded.
Why is it needed?
- Traffic spikes – keep a single server from crashing when requests surge.
- Horizontal scaling – add more servers instead of upgrading a single one.
- High availability – route traffic away from a failed server.
Where does Nginx fit?
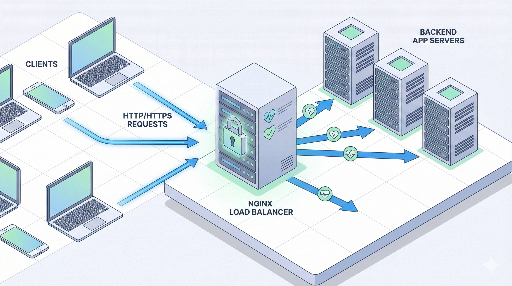
Typical architecture:
Client → Nginx (load balancer / reverse proxy) → multiple application servers
Nginx receives the request and forwards it to one of the backend servers.
2. Understanding the Basic Structure of Nginx Load Balancing
In Nginx, load balancing revolves around two key blocks:
- upstream – defines the pool of backend servers.
- server / location – decides which upstream to use for incoming requests.
Here’s the simplest example:
http {
    upstream app_backend {
        server 10.0.0.101:3000;
        server 10.0.0.102:3000;
    }

    server {
        listen 80;
        server_name example.com;

        location / {
            proxy_pass http://app_backend;

            # Default proxy headers
            proxy_set_header Host $host;
            proxy_set_header X-Real-IP $remote_addr;
            proxy_set_header X-Forwarded-For $proxy_add_x_forwarded_for;
            proxy_set_header X-Forwarded-Proto $scheme;
        }
    }
}
What this configuration does
upstream app_backendgroups two app servers into one pool.proxy_pass http://app_backend;forwards client requests to one server in the pool.- If no algorithm is specified, Nginx defaults to round‑robin.
3. Load Balancing Algorithms
Nginx offers several distribution strategies. Choosing the right one depends on your workload.
3.1 Default: Round‑Robin
If you don’t specify anything, round‑robin is used.
upstream app_backend {
    server 10.0.0.101:3000;
    server 10.0.0.102:3000;
}
- 1st request → server1
- 2nd request → server2
- 3rd request → back to server1, and so on.
Pros: Simple and works well in most cases. Cons: Ignores current load on each server.
3.2 least_conn
upstream app_backend {
    least_conn;
    server 10.0.0.101:3000;
    server 10.0.0.102:3000;
}
Routes new requests to the server with the fewest active connections. Useful when request durations vary.
Recommended scenarios: * Some API calls are long‑running while others finish quickly. * Servers have similar specs but uneven traffic patterns.
3.3 ip_hash
upstream app_backend {
    ip_hash;
    server 10.0.0.101:3000;
    server 10.0.0.102:3000;
}
Hashes the client IP so that the same user always hits the same server. Handy for sticky sessions when sessions are stored in memory.
Pros: Keeps a user’s session on one server. Cons: Adding or removing servers can re‑hash many users; may not work if the real client IP is hidden behind a CDN or load balancer.
3.4 Weighted Distribution
When servers differ in capacity, you can assign weights.
upstream app_backend {
    server 10.0.0.101:3000 weight=3;
    server 10.0.0.102:3000 weight=1;
}
Server1 receives 3/4 of the traffic, server2 1/4. Great for leveraging newer, stronger hardware.
4. Health Checks and Handling Failed Servers
A smart load balancer should automatically remove dead servers.
Nginx’s open‑source version supports passive health checks.
4.1 max_fails / fail_timeout
upstream app_backend {
    server 10.0.0.101:3000 max_fails=3 fail_timeout=30s;
    server 10.0.0.102:3000 max_fails=3 fail_timeout=30s;
}
max_fails=3– after three consecutive failures, the server is marked unhealthy.fail_timeout=30s– the server is skipped for 30 seconds, then retried.
Failures are typically 502/503/504 responses or connection errors.
4.2 proxy_next_upstream
Decide when to retry the next server.
location / {
    proxy_pass http://app_backend;
    proxy_next_upstream error timeout http_502 http_503 http_504;
}
Only retry on the specified errors; avoid excessive retries that add latency.
5. Practical Example: Load Balancing a Simple Web Service
Assume two Node.js servers running on port 3000:
10.0.0.101:300010.0.0.102:3000
5.1 Nginx Configuration
http {
    upstream app_backend {
        least_conn;

        server 10.0.0.101:3000 max_fails=3 fail_timeout=30s;
        server 10.0.0.102:3000 max_fails=3 fail_timeout=30s;
    }

    server {
        listen 80;
        server_name myservice.com;

        location / {
            proxy_pass http://app_backend;

            proxy_set_header Host $host;
            proxy_set_header X-Real-IP $remote_addr;
            proxy_set_header X-Forwarded-For $proxy_add_x_forwarded_for;
            proxy_set_header X-Forwarded-Proto $scheme;

            proxy_read_timeout 60s;
            proxy_connect_timeout 5s;
            proxy_send_timeout 10s;
        }
    }
}
Reloading Nginx applies the changes:
- All traffic to
myservice.comis forwarded to the least‑connected Node.js server. - A server that fails repeatedly is temporarily excluded.
6. HTTPS Termination + Load Balancing
In production, HTTPS is almost mandatory. The common pattern is to terminate SSL at Nginx.
http {
    upstream app_backend {
        least_conn;
        server 10.0.0.101:3000;
        server 10.0.0.102:3000;
    }

    server {
        listen 443 ssl;
        server_name myservice.com;

        ssl_certificate     /etc/letsencrypt/live/myservice.com/fullchain.pem;
        ssl_certificate_key /etc/letsencrypt/live/myservice.com/privkey.pem;

        location / {
            proxy_pass http://app_backend;

            proxy_set_header Host $host;
            proxy_set_header X-Real-IP $remote_addr;
            proxy_set_header X-Forwarded-For $proxy_add_x_forwarded_for;
            proxy_set_header X-Forwarded-Proto $scheme;
        }
    }

    # Redirect HTTP → HTTPS
    server {
        listen 80;
        server_name myservice.com;
        return 301 https://$host$request_uri;
    }
}
- Client ↔ Nginx: HTTPS
- Nginx ↔ backend: HTTP (usually fine on an internal network)
7. Sticky Sessions: Do You Really Need Them?
Older setups often stored sessions in memory, requiring the same user to hit the same server. ip_hash can solve this, but modern approaches prefer:
- External session stores (Redis, Memcached)
- Stateless JWT tokens
Removing application‑level state lets the load balancer focus solely on traffic distribution, which simplifies scaling.
8. Common Tuning Points
8.1 Keepalive Connections
Reusing connections to backends improves performance.
upstream app_backend {
    least_conn;
    server 10.0.0.101:3000;
    server 10.0.0.102:3000;

    keepalive 32;
}

server {
    location / {
        proxy_pass http://app_backend;
        proxy_http_version 1.1;
        proxy_set_header Connection "";
    }
}
keepalive 32;keeps up to 32 idle connections per worker.- Avoids TCP handshake overhead.
8.2 Buffers & Timeouts
Large responses or slow backends require careful buffer and timeout settings.
location / {
    proxy_pass http://app_backend;

    proxy_buffering on;
    proxy_buffers 16 16k;
    proxy_busy_buffers_size 64k;

    proxy_read_timeout 60s;
    proxy_send_timeout 60s;
}
- Short
proxy_read_timeoutcan trigger 504 errors. - Adjust based on real traffic and backend performance.
9. Step‑by‑Step Strategy for Introducing Nginx Load Balancing
If you already have a single‑server deployment, consider the following phases:
- Phase 1 – Reverse Proxy * Client → Nginx → existing single app server. * Add SSL termination, caching, and static file serving.
- Phase 2 – Duplicate App Servers
* Spin up a second server and sync data.
* Add both to an
upstreamblock. - Phase 3 – Health Checks & Monitoring
* Configure
max_fails,fail_timeout,proxy_next_upstream. * Deploy logging/metrics (Prometheus + Grafana, ELK, etc.). - Phase 4 – Algorithm & Fine‑Tuning
* Choose
least_connor weighted distribution. * Tune keepalive, buffers, and timeouts.
Conclusion
Nginx is far more than a simple reverse proxy. With its robust load‑balancing features, you can:
- Define backend pools with
upstream. - Pick the right algorithm (round‑robin, least_conn, ip_hash, weight).
- Automate failure handling with health checks and retry policies.
- Terminate HTTPS while keeping backend traffic internal.
Mastering these concepts lets you scale traffic smoothly and keep your services reliable as demand grows.


There are no comments.