Simplifying Dynamic Web Development with Django and HTMX (Part 3): Integrating with Django
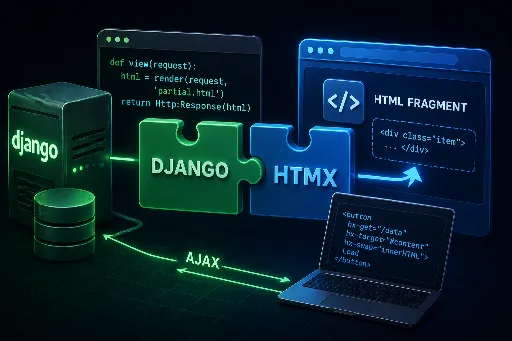
The robust backend of Django, with its "Batteries Included" philosophy, and HTMX, which cleverly leverages fresh HTML snippets from that backend, truly make a fantastic combination.
Following up from the previous installment, this post, Part 3 of our series on Simplifying Dynamic Web Development with Django and HTMX, will explore two specific methods for integrating HTMX into a real Django project.
1. Direct Usage Without a Third-Party Package

This is the purest and lightest approach. You can instantly use HTMX's features by simply adding a single script tag to your HTML template, without any complex installation procedures.
Installation Methods
The official HTMX documentation suggests several installation methods, but the fastest way is undoubtedly to leverage a CDN.
- Using CDN (Fastest): Simply add the following code inside the
<head>tag of yourbase.html.
<script src="https://cdn.jsdelivr.net/npm/htmx.org@2.0.10/dist/htmx.min.js" integrity="sha384-H5SrcfygHmAuTDZphMHqBJLc3FhssKjG7w/CeCpFReSfwBWDTKpkzPP8c+cLsK+V" crossorigin="anonymous"></script>
- Direct Download: If security or an offline environment is crucial, you can download htmx.min.js, place it in your project's
staticfolder, and specify the path. - npm: If you're using a build system, you can install it with the
npm install htmx.orgcommand.
Go to the official HTMX installation documentation
2. Using the django-htmx Package
Within the Django ecosystem, there's a dedicated library that helps you use HTMX in a more "Django-esque" way: django-htmx.
Installation and Configuration
Follow the steps below as outlined in the official django-htmx documentation.
-
Install the package
bash python -m pip install django-htmx -
Register in INSTALLED_APPS
python INSTALLED_APPS = [ ..., "django_htmx", ..., ] -
Add Middleware
python
MIDDLEWARE = [
        ...,
        "django_htmx.middleware.HtmxMiddleware",
        ...,
]
How Convenient is django-htmx?
Given that HTMX is inherently a simple tool, one might legitimately question the necessity of installing an additional package like django-htmx. Indeed, core functionalities can be implemented without it. However, a closer look at the convenience features this package offers reveals why many developers choose to adopt it.
According to the official django-htmx documentation, its most significant feature is extending the request object via middleware. Once the middleware is registered, a request.htmx attribute becomes available, allowing easy access to detailed information such as:
- Request Information:
boosted,current_url,current_url_abs_path,history_restore_request,prompt - Target and Trigger Control:
target,trigger,trigger_name,triggering_event
Furthermore, it supports two dedicated template tags that assist with template operations:
{% htmx_script %}: This is the main tag for injecting the HTMX library script.{% django_htmx_script %}: This auxiliary tag inserts only the extended debugging script when HTMX is included directly via CDN or static files.
Particularly impressive are the 11 useful methods included in the django_htmx.http module. Among them, trigger_client_event() stands out. By easily configuring and sending the HX-Trigger header from the server with the response, it allows direct control of client events from the server. Once you get used to it, it becomes an incredibly powerful and frequently used tool.
Of course, all these functionalities can be implemented by developers manually, by writing custom middleware or manipulating headers. Thus, for those who prefer a hands-on approach, like myself, it might not feel like an essential package.
In conclusion, while django-htmx is not a "must-have," it is undeniably a package that "significantly enhances development comfort." Its official documentation is concise, allowing you to grasp it within an hour or two. Therefore, consider adopting it based on your project's nature.
Conclusion
If you're only planning to implement a few simple features like toggle buttons or 'like' functionalities, direct usage (via CDN) is often sufficient. Avoiding unnecessary dependencies can be the most economical approach.
However, as your project scales and you frequently encounter situations where a single view needs to handle both full and partial page updates, django-htmx becomes a compelling option.
Which approach appeals more to you? In reality, since django-htmx is a lightweight package, simply installing it without overthinking might be the correct answer. Ultimately, it often comes down to a developer's preference and personality—whether one aims to minimize dependencies or prefers to implement most things manually.
Regardless of your choice, with HTMX, you'll enjoy the pleasure of stepping away from JavaScript and returning to the simplicity of HTML.
Related Articles :
- Simplifying Dynamic Web Development with Django and HTMX (Part 1)
- Simplifying Dynamic Web Development with Django and HTMX - Ajax (Part 2)
- Simplifying Dynamic Web Development with Django and HTMX (Part 3): Integrating with Django
- Simplifying Dynamic Web Development with Django and HTMX (Part 4): Understanding Payload Transmission
- Simplifying Dynamic Web Development with Django and HTMX: Leveraging Forms and Serializers
- Simplifying Dynamic Web Development with Django and HTMX: Mastering Triggers


There are no comments.