面向深度学习初学者的 NumPy ndarray 基础:array、dtype、shape、reshape、astype
1. 为什么从 ndarray 开始?

在深度学习中,你会频繁看到以下代码片段。
- 检查输入张量的
shape - 为批处理使用
reshape - 为 GPU 运算将数据转换为
float32…
所有这些操作的“根源”就是 NumPy 的 ndarray。
- PyTorch 的
Tensor基本上是 几乎完全复制 NumPyndarray的结构 - 深度学习模型的输入、权重、输出全都是 多维数组(即张量)
因此,深入理解 ndarray 就等同于掌握张量运算的基本语法。
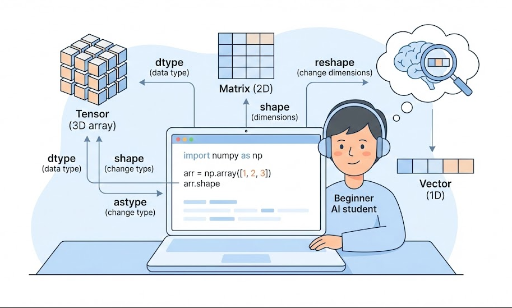
2. ndarray 是什么?
ndarray 是 N‑dimensional array 的缩写,意为 “N 维数组”。
- 1 维:向量
- 2 维:矩阵
- 3 维及以上:张量(如图像批、时序数据、视频等)
简单示例:
import numpy as np

x = np.array([1, 2, 3])            # 1 维(向量)
M = np.array([[1, 2], [3, 4]])     # 2 维(矩阵)

print(type(x))          # <class 'numpy.ndarray'>
print(x.ndim, x.shape)  # 维数,形状
print(M.ndim, M.shape)
ndim:维数shape:各维度的大小
3. PyTorch Tensor 与 ndarray 的相似度
PyTorch 张量最终也是 “多维数组”。
import torch

x_np = np.array([[1, 2], [3, 4]])   # NumPy ndarray
x_torch = torch.tensor([[1, 2], [3, 4]])  # PyTorch Tensor

print(type(x_np))      # numpy.ndarray
print(type(x_torch))   # torch.Tensor

print(x_np.shape)      # (2, 2)
print(x_torch.shape)   # torch.Size([2, 2])
共同点:
- 都是 “多维数值数组”
shape、reshape、dtype概念几乎相同- 运算方式也相似(
+、*、@等)
差异(深度学习中的关键):
- NumPy:CPU、无自动微分
- PyTorch Tensor:可使用 GPU、支持自动微分
常见使用方式:
- 概念练习 / 公式实验 / 数据处理 → NumPy
- 实际模型训练 → PyTorch
熟悉 ndarray 后,PyTorch 张量运算会更自然。
4. np.array:创建 ndarray 的基本方法
ndarray 最基本的构造函数是 np.array。
4.1 Python 列表 → ndarray
import numpy as np

# 1 维数组(向量)
x = np.array([1, 2, 3])
print(x)
print(x.ndim)   # 1
print(x.shape)  # (3,)

# 2 维数组(矩阵)
M = np.array([[1, 2, 3],
              [4, 5, 6]])
print(M)
print(M.ndim)   # 2
print(M.shape)  # (2, 3)
- 把 Python 的 列表 / 列表的列表 传给
np.array就得到ndarray。 - 深度学习中常见的
batch_size x feature_dim矩阵也属于此类。
4.2 快速创建初始值
在实验或示例中,常需要 从零或随机数 开始。
zeros = np.zeros((2, 3))       # 2x3 矩阵,全 0
ones = np.ones((2, 3))         # 2x3 矩阵,全 1
randn = np.random.randn(2, 3)  # 正态分布随机数

print(zeros.shape)  # (2, 3)
PyTorch 也几乎相同。
import torch

zeros_t = torch.zeros((2, 3))
ones_t = torch.ones((2, 3))
randn_t = torch.randn((2, 3))
5. dtype:理解数字的“数据类型”
dtype 表示 数组中数字的类型。
常见类型:
int32、int64:整数float32、float64:浮点数
示例:
x = np.array([1, 2, 3])
print(x.dtype)  # 通常是 int64 或 int32

y = np.array([1.0, 2.0, 3.0])
print(y.dtype)  # 通常是 float64
5.1 指定 dtype 创建
x = np.array([1, 2, 3], dtype=np.float32)
print(x.dtype)  # float32
深度学习中常用 float32(PyTorch 的 torch.float32),因为它适合 GPU 运算且占用内存适中。
6. shape:读取数据的“形状”
shape 是一个元组,表示数组在各维度上的大小。
import numpy as np

x = np.array([1, 2, 3])
print(x.shape)  # (3,)

M = np.array([[1, 2, 3],
              [4, 5, 6]])
print(M.shape)  # (2, 3)
深度学习中常见的 shape 示例:
- 单个特征向量:
(feature_dim,)→ 例如(3,) - 批量数据:
(batch_size, feature_dim)→ 例如(32, 3) - 图像批(PyTorch 默认):
(batch_size, channels, height, width)→ 例如(32, 3, 224, 224)
熟悉 NumPy 的 shape 后,遇到 PyTorch 张量的 shape 错误时更容易定位。
7. reshape:改变形状
reshape 在保持元素总数不变的前提下,仅改变数组的形状。
import numpy as np

x = np.array([1, 2, 3, 4, 5, 6])
print(x.shape)  # (6,)

M = x.reshape(2, 3)
print(M)
print(M.shape)  # (2, 3)
关键点:
- 总元素数必须相同。
7.1 使用 -1 自动推算
在批处理或图像处理中,-1 用来让系统自动计算维度。
x = np.array([[1, 2, 3],
              [4, 5, 6]])  # shape: (2, 3)

# 展平成 1 维(flatten)
flat = x.reshape(-1)        # shape: (6,)
print(flat)

# 再 reshape 为 2 行,列自动计算
M = flat.reshape(2, -1)     # shape: (2, 3)
print(M)
PyTorch 也类似。
import torch

x_t = torch.tensor([[1, 2, 3],
                    [4, 5, 6]])  # (2, 3)

flat_t = x_t.reshape(-1)        # (6,)
M_t = flat_t.reshape(2, -1)     # (2, 3)
熟练使用 reshape 后,以下操作更直观:
- CNN 中的 flatten
- RNN/LSTM 输入整理为
(batch, seq_len, feature) - 批维度的前后切换
8. astype:改变 dtype
astype 用来 转换数组的数值类型。
import numpy as np

x = np.array([1, 2, 3])      # int
print(x.dtype)               # int32 或 int64

x_float = x.astype(np.float32)
print(x_float)
print(x_float.dtype)         # float32
常见场景:
- 将整数标签转换为浮点数以计算 loss
- 将
float64数据统一为float32 - 在传给 PyTorch 前确保类型匹配
示例:
import torch
import numpy as np

x = np.array([1, 2, 3], dtype=np.int32)
x = x.astype(np.float32)              # 转为 float32
x_torch = torch.from_numpy(x)         # 转为张量
print(x_torch.dtype)                  # torch.float32
若不匹配,PyTorch 可能报 “Expected Float but got Double” 等类型错误。
9. 总结:今天学到的 ndarray 基础语法
本篇文章涵盖:
ndarray是什么? * 深度学习中所有数据结构的基础——多维数组- 与 PyTorch
Tensor的关系 * 概念上几乎相同,深度学习版的ndarray np.array* 从 Python 列表创建ndarraydtype* 数字类型(int/float,32/64 位)shape* 数据形状,深度学习中最常见的属性reshape* 保持元素数不变,仅改变形状(-1自动推算)astype* 类型转换(如int→float32)
掌握这七个概念(array、dtype、shape、reshape、astype)后,你可以:
- 在遇到张量 shape 错误时不再慌张
- 在论文公式与代码之间自如切换
- 更轻松地跟随 PyTorch 教程


目前没有评论。